
Free Patterns & Instruction
Free Patterns

Autumn Leaves quilt
Designed by Jan Krentz (2003) for the Viewpoint Collection
by Timeless Treasures Fabrics — Pattern - PDF file

Quick Lemoyne Star, Broken Star & Snow Crystal Quilt Patterns – using the Fast 2 Cut Fussy Cutter 45 rulers
The diamond size (in the PDF) is 6-1/2" across the diamond (parallel edge to parallel edge – NOT the measurement along the side of the diamond shape.) These diamonds are easily cut with an acrylic ruler specifically for that purpose. When "fussy cutting" fabrics with printed designs, you can center the ruler over the design, trace the key elements onto the ruler, and cut as many diamonds of that repeat as you need.
Free Lesson – Drafting 101
Focus: Cutting Specific Shapes
- Half-square triangles,
- Quarter-square triangles,
- Diamonds, & Lone Star borders
- Y Seam Lesson
|
Many quilters find they have difficulty moving from commercial patterns to designing their own blocks, borders and appliqué patterns. Some of the challenge for pieced designs, in particular, is figuring the exact dimensions you'll need to cut, allowing for proper seam allowance, to have an accurate finished project. |
I use the following method for drafting blocks or designs for my own work. Working with squares and rectangles (which have 90° corners) is relatively straight-forward by adding seam allowance and figuring the strip widths to cut. However, when sewing shapes with any angles other than 90°, such as you'd find with diamonds, triangles, hexagons, polygons, etc, the cutting dimensions get a bit more challenging. |


Cutting Specific shapes


|
Lone Star Border Shapes: For those who have taken a Lone Star class and struggle with the final, outer border area, try this! |
|
|
1 – Measure the straight-grain sides of several of the Lone Star diamond units. Measure ONLY from the point where the 1/4" seamline is at each end of the unit. (see illustration 1a). 1b – Take the average of these measurements. This becomes the seam length for the inset square or triangle that surrounds the Lone Star units. (illustration 1b). |
|
|
|
|
2 – Next, draw the outer border shapes. Record the seamline measurement from the diamond unit's straight edge ( X ) – also the same measurement as the square or triangle inset, 1b, above. Draw a seamline between these two dots, and extend this line beyond the dots about 8" on either side. |
|
|
|
|
4 |
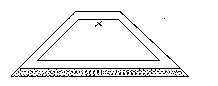
4 – Draw the longest side of this border shape. It will be the outside edge of the quilt. (this side appears at the bottom of the shapes in 3a & 3b). |
|
5 |
5 – Add 1/4" seam allowances to the top, bottom & 2 sides. You may want to add 1/2" - 1" additional width to allow for binding the quilt's edge without cutting off your points. (shaded area represents where binding will be on finished quilt) |
6 Set-in corners (represented by dark dots) |
6 – Further construction note: the intersections where the diamond units meet the inset corners, and then again when the borders are sewn on will be a set-in corner. (see illustration 6) Be sure to pin the seamline carefully, sew up to the 1/4" dot, and backstitch, leaving the seam allowance free. Insert all pieces in this manner. |
 1a
1a 1b
1b

 3a
3a 

|
|
----------------------- End of Free Lesson -----------------------
Do you have Questions, Comments, or Requests for future lessons you'd like to see here?
Send me a note, and I'll work with requests first!

