Workshop Supply List

Rainbow Split Broken Star

Rainbow Split Broken Star

Tools and Equipment

The following list may be daunting – FEAR NOT!  Students in previous workshops have requested the items below for use in class. PLEASE MARK ALL EQUIPMENT WITH YOUR NAME   

USE AT HOME TO PREPARE YOUR FABRIC:

Rotary cutting acrylic rulers: 1 quilter's square, 6-1/2" x 24" ruler and 6 1/2" Fussy Cutter Diamond ruler (if you own one - otherwise you can cut the diamonds in class)
– optional but recommended – glue stick or Elmer's school glue or Roxanne's Glue Baste-it (bottle) or similar glue (for swatches  use on your color chart at home before class)

FOR USE IN CLASS: 

Quick Star Quilts & Beyond by Jan Krentz – text book for class (available for pre-order / purchase – $28 retail; CA sales tax applies within state of CA)
fast2cut "Fussy Cutter" 45º diamond ruler set (available for trial and purchase in class if desired) - excellent for "fussy cutting" motifs ($25 retail;  CA sales tax applies within state of CA)
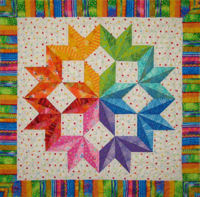
Pre-cut fabrics for star and background – bring ALL fabrics, including scraps after cutting.  See Fabric Selections for color ideas. Multi-day (3 or more days) classes: you may piece strip pairs in advance, OR sew in class.
FOR TWO-DAY CLASSES: SEW pairs of strips together with a scant 1/4 inch seam BEFORE CLASS. Press seams open. You will have 8 different combinations of colors, according to your personal fabric selection. Bring to class.
Sewing machine with filled bobbins, foot pedal, brush, carrying case, etc. If you are unfamiliar with your machine, bring the operator's manual. 
Quarter-inch presser foot, standard foot, and walking foot if you own one (some machines do not stitch well with a quarter-inch foot. Switching to either of the other two feet can improve the quality of your stitching.)
Sewing thread to blend with fabric – medium shade (do not select hand quilting thread) 
Size 10/12 (70/80) sharp, topstitch, embroidery or quilting machine needles (not universal point)
Rotary cutter with new blade (45mm medium or 60mm large cutter size) – self-closing style recommended for classroom safety
Self-healing rotary cutting mat (18" x 24")   Quilter's Quick Quarter tool   (or similar tool to mark 1/4’’ seams on fabric – available for classroom use and optional purchase – click link for more detail.)
Stiletto, skewer or similar tool seam ripper Sewing scissors or thread snips 1 sheet fine Sandpaper or a sandpaper board (used in applique)
Sewing pins – glass ball head, fine .5 shaft pins are best for matching seams (preferred instead of heavy-weight quilting pins with plastic heads)

pencil / pen  for notes 

Name Tag  colored pencils for color chart and marking fabrics (see note pencil sharpener
3-ring binder for supply list, paste-up & class handout sheets   
3-5 colored pencils or textile pens for marking fabric  /  light colored marking pencil for dark fabrics
Sharpie marker – fine and / or extra fine ("twin-tip" Sharpies are wonderful!)
Iron  (in class, share 1 iron between 3 or 4 students) 
72" x 72" piece of flannel, batting or flannel-backed plastic tablecloth for design wall surface
200-300 safety pins to secure project to flannel for safe transport
Heavy-duty 3-prong extension cord and power strip

 OPTIONAL SUPPLIES:  (highly recommended, not mandatory for class)  

4 pieces – 1 1/4" PVC pipe, cut into equal lengths for table leg extensions (slip the pipes onto the tubular legs of a standard banquet table. The extensions elevate the table to a better height to eliminate back strain in class. I am 5'6" and my extensions are 11" high.)  see link below for more detail.
reading glasses Ott light or desk lamp digital camera (used as a design tool) inflatable or foam chair cushion (strongly recommended)
2 rubber door stops to tilt machine toward you (very helpful!!) sewing machine bed extension
Please arrive and set up 30 minutes before class starts. I want you to get the most from the day, because I have lots of great information to share!  

 Fabric Requirements:

The quilt may be cut using the 6 1/2" or 3" diamond ruler. Finished sizes (with borders): 70-72" square (large ruler), or 30-32" square (small ruler); quantities stated for BOTH quilts.

Select only ONE for class. The 4-1/2" strips (larger quilt – 6 1/2" ruler) are cut full width, selvage-to-selvage.

FABRIC

Placement in Quilt

Number of pieces (for 6 1/2" ruler)

Number of pieces for 3" ruler

Fabric #1

2 1/2 yards fabric

background

(white)

WITH SET-IN Y-SEAMS:

cut 4 borders –2" x 70" or 8 strips, 2" x selvage-to-selvage.

20 – 9" x 9" squares

2 – 13 1/4" squares – cut twice diagonally to yield 8 triangles

OPTION WITH SET-IN Y-SEAMS:

4 border strips – 1 1/2" x 42"

20 squares – 4" x 4"  (optional: fussy cut designs in squares)

2 – 6 1/4" squares, cut 2x diagonally to yield 8 triangles

OPTION WITHOUT SET-IN SEAMS:
*4 border strips – 1 1/2" x 42"

*16 squares – 4 3/8" –  cut 1x diagonally to yield 32 triangles

*16 squares – 3 3/8" Cut 1x diagonally to yield 32 triangles 

1/8–1/4 yard

16 fabrics

for the split diamonds

for the split diamonds

#2

medium yellow

1 – 4 1/2" strip

1 strip – 3" w x 22"

#3

dark yellow

1 – 4 1/2" strip

1 strip – 3" w x 22"

#4

medium green

1 – 4 1/2" strip

1 strip – 3" w x 22"

#5

darker green

1 – 4 1/2" strip

1 strip – 3" w x 22"

#6

medium aqua

1 – 4 1/2" strip

1 strip – 3" w x 22"

#7

darker aqua

1 – 4 1/2" strip

1 strip – 3" w x 22"

#8

medium blue

1 – 4 1/2" strip

1 strip – 3" w x 22"

#9

darker blue

1 – 4 1/2" strip

1 strip – 3" w x 22"

#10

medium lavender

1 – 4 1/2" strip

1 strip – 3" w x 22"

#11

purple

1 – 4 1/2" strip

1 strip – 3" w x 22"

#12

medium orchid

1 – 4 1/2" strip

1 strip – 3" w x 22"

#13

darker red/violet

1 – 4 1/2" strip

1 strip – 3" w x 22"

#14

fuchsia pink

1 – 4 1/2" strip

1 strip – 3" w x 22"

#15

darker pink

1 – 4 1/2" strip

1 strip – 3" w x 22"

#16

medium red

1 – 4 1/2" strip

1 strip – 3" w x 22"

#17

darker red

1 – 4 1/2" strip

1 strip – 3" w x 22"

#18

 7/8–1 yard multi-colored stripe fabric - border

8 strips – 3" x 42" (selvage to selvage, or cut perpendicular to the stripe)

4 strips – 3" X 42" (cut selvage to selvage, or perpendicular to the stripe pattern)

#19

5/8 yards binding fabric

(for use at home – not necessary to bring to class)  2 3/4" x 276 linear inches (cut as straight grain or bias; short ends seamed together at 45° angles to minimize bulk) approximately 4 yards (144 linear inches) continuous straight grain or bias binding.

#20

4 1/4 yards backing fabric

(for use at home – not necessary to bring to class) Cut in half; remove selvages on all edges. Seam two lengths together at edges to create an adequate-sized backing, OR purchase appropriate amount of extra-wide quilt backing fabric or flannel. 34" to 36" square of fabric for backing. Same amount for batting.

Click here for fabric ideas and further information

Supply List Tips & Tools

  1.  Supply List Q & A
  2.  Quarter inch presserfeet
  3.  Sewing machine needles
  4.  Quilt skill levels
  5.  Stilettos and other tools
  6.  Sewing machine walking feet
  7.  Table leg extenders

  8.  Roxanne's Glue Baste-it
  9.  3M Command Strips & Clips
10. Singer Featherweight information
11. Quilter's Cut 'n Press Board
12. Quilter's Quick Quarter ruler
13. Sewing Machine Extension Tables
14. Calibrate 1/4 inch Seam Allowances

back

Teacher of the year 1998