Hunter Star - Variable Hunter Star
Create this simple, dynamic pieced design with your selection of fabrics. The prominent variable star in the quilt‘s center is created with contrasting fabric selection. Using Jan‘s innovative assembly technique, you‘ll love how all the piecing ‘locks’ together. Please prepare by cutting fabric before class. During the workshop we‘ll begin assembly with strip piecing, cutting and pressing tips for success. If you prefer to make a larger or smaller quilt, please adjust the fabric quantities accordingly. Please label ALL sewing equipment with your name.
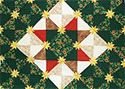
The Hunter Star quilt design features forty-eight 8" blocks. Arranging the light, dark and medium colored fabrics creates a central variable star design. There are two border options shown; the star border is more complex (challenging) than the straight 2-color strip border (simpler). A third border option is found on page 79 in Hunter Star Quilts and Beyond or seen on the quilt pictured on Jan‘s website.
This class will cover Jan‘s innovative strip-piecing technique. Pre-cut fabric pieces may not make sense before class but will become apparent as you construct the quilt design. First select the two main colors for background blocks A & B. Second, select the fabrics C & D for the central variable star design. Third, select the two shades for the small stars (they should contrast sharply with all the other fabrics). The border fabrics can blend or contrast, as you prefer.

COLORING PAGE – Permission granted to reproduce this page for personal use
Decide where your fabrics will be. The central star and surrounding square are emphasized.

The fabric placement is indicated – you can make several copies, shade in the areas with colored pencils to see the overall appearance in the colors you have selected. The star points will alternate, 2 shades of a similar color. The central large star (fabric C) and surrounding square-on-point (D) can be one or two similar fabrics for each section, as you prefer.
NOTE – Design Layout Options – Variable Star, Asymmetric, or Alternating scrappy fabric collection:
Students may create any design layout they prefer – including the Asymmetric layout – with the blocks constructed with this method. The construction method is the focus of the class (morning) and layout is the focus in the afternoon. This construction method differs from the Asymmetric class method, and the blocks will be 8" in size rather than 10 or 11" (as in the published African Asymmetric quilt).
Select a varied palette of fabrics – cut a few squares and one 3 3/4" wide strip per fabric. Cut each 3 3/4" strip in half lengthwise, creating 2 identical length strips. Bring all excess fabric to class in order to cut more pieces if desired. Study the quilt gallery in the back of the Hunter Star Quilts book for fabric selection ideas.
Supply List (all pages are also available as a printer-friendly PDF)
Sewing machine & equipment
- sewing machine with bobbins, foot pedal, extension cord or power strip
- presser feet for the sewing machine: quarter-inch, standard, & walking foot
- pressing pad/board & iron (one for every 3-4 students – shops or guilds may provide irons)
- lint brush for machine (to clean bobbin area during sewing in class)
Cutting equipment
- sewing scissors or thread snips
- 24" x 18" or larger rotary cutting mat
- acrylic rulers: 6" x 24"; MUST HAVE 45° guidelines;
- optional but recommended: large Fussy Cutter 45° ruler (available to test in class) OR smaller rotary ruler – (shorter than 24"– any of the following sizes: 6" x 12", 3" x 18", 3" x 12", etc.)
- Please PRINT the appropriate PDF and bring to class: Right-handed pattern / Left-handed pattern (please de-select "shrink to fit page" option in your printer. Jan will have a couple of extra copies in class if your print-out isn't quite right)
Classroom text and office supplies
- Hunter Star Quilts book by Jan Krentz (cut off spine & 3-hole-punch the book pages at office supply store)
- 3-ring notebook for book – to hold the book, supply list and workshop handouts (important—please bring)
- rotary cutter with sharp blade
- pen or pencil for notes
Sewing notions / Thread
- 1 or 2 spools sewing thread to coordinate with fabrics (do not select hand quilting thread) – wind 2-3 bobbins in advance
- glass-headed sewing pins (.5 fine shaft is good)
- Schmetz machine needles – size 70 or 80 (Quilting, Sharp, Topstitch, Metafil recommended – not Universal needles)
- seam ripper
- design surface – large piece of flannel, flannel-backed tablecloth or white felt
- safety pins to secure pieces to design surface
Optional Equipment
- heavy-duty extension cord; multi-outlet power strip
- colored pencils (for coloring the design at home)
- sack lunch (check with program organizer regarding meal provisions)
- Recommended for taller students to prevent back pain experienced during workshops when cutting on a low surface:
table leg extenders – 4 pieces 1-1/4" PVC pipe, pre-cut in one of the following lengths: 11" or 12"or 13". I am 5'6" and use the 11" length to elevate a table for cutting station. An alternative is to bring a set of Bed Raisers, found in most bedding sections at department stores.
- chair cushion – to elevate you for better sewing height in class
Fabric Requirements – Body of the Quilt:
Yardage quantities allow for large lap-sized quilt top, 6 rows of 8 blocks, plus borders
Finished size with 6" borders: Approximately 60" wide by 76" long
|
FABRIC
|
YARDAGE REQUIREMENTS
|
CUTTING INSTRUCTIONS
|
|
Fabric A blocks
|
3/8 yard each of SIX different fabrics for each color family
OR large scraps totaling 2-1/4 yards
|
(total # pieces, some from each fabric)
15 – 7-1/2" squares, cut once diagonally
6 strips, 3-3/4" w ide strips (selvage to selvage). Cut in half at center fold. (yield 12 — 3-3/4" W x apprx 22" L).
|
|
Fabric B blocks
|
3/8 yard each of SIX different fabrics for each color family
OR large scraps totaling 2-1/4 yards
|
(total # pieces, some from each fabric)
15 – 7-1/2" squares, cut once diagonally
6 strips, 3-3/4" wide strips (selvage to selvage). Cut in half at center fold (yield 12 — 3-3/4" W x apprx 22" L).
|
|
Fabric C – large central star
|
1 yard (if using a single fabric) or
2 fabrics – (1/2 yard of each)
|
(total # pieces, some from each fabric)
8 – 7-1/2" squares, cut once diagonally
2 – 3-3/4" wide strips (selvage to selvage).
|
|
Fabric D – background around central star
|
1 yard light background fabric
(or several light colored fabrics totalling 1 yard)
|
(total # of pieces)
10 – 7-1/2" squares, cut once diagonally
3 – 3-3/4" wide strips (selvage to selvage); cut one in half at center fold (yield 2 full selvege-to-selvege pieces PLUS, 2 short pieces — 3-3/4" W x apprx 22" L).
|
|
Fabric 1 for small 45° diamonds – lighter value
|
1/2–3/4 yard fabric that contrasts in color or value from A, B, C, & D
|
(total pieces for body of quilt, excluding border)
9 – 1-1/2" strips. Some will be cut into shorter lengths in class.
|
|
Fabric 2 for small 45° diamonds – medium or darker value
|
1/2–3/4 yard fabric that contrasts in color or value from A, B, C, & D
|
(total pieces for body of quilt, excluding border)
9 – 1-1/2" strips. Some will be cut into shorter lengths in class.
|
|
tiny 45° 8-pt. stars in border (optional)
|
fabrics 1 & 2 or others if preferred
|
(for border option with star points)
2 – 1-1/2" w strips of EACH COLOR (total 4 strips) (see note below)
|
BORDER Option: select border fabric following class if desired
Border fabrics should compliment the blocks. **Determine whether you prefer straight strip borders or pieced borders (refer to the sketch). Yardage is given for both options. CHOOSE ONE, not both. (Border yardage may also be used in the blocks if desired; cut long border strips first; then cut requisite block units from the excess.)
|
Border
|
Simple Border A - All one Piece
|
Border B - pieced with small stars
|
|
1" wide (finished) narrow, inner border
|
2-1/4 yards
2 strips, 1-1/2" x 52" – inner border fabric
2 strips, 1-1/2" x 68" – inner border fabric (cut lengthwise from yardage)
|
3/8 yard
Cut 7 strips – 1-1/2" wide. Cut into 14 pieces, 1-1/2" x 14 1/2".
|
|
4" wide
outer border
|
2-1/4 yards
follow directions in Hunter Star Quilts
|
2 yards
cutting directions found on pages 76-78 in Hunter Star Quilts & Beyond book
|
| Small Star points (diamonds) |
(none - information listed above) |
2 – 1-1/2" strips of each color – listed and cut above. Do not cut duplicates. |
BRING ALL EXCESS FABRIC TO CLASS!
Fabric Chart – Paste fabrics on the chart. Keep this chart in your notebook.
|
Block Fabrics A
|
Block Fabrics B
|
Central Star C
|
Central Background D
|
|
A1
|
B1
|
C1
|
D1
|
|
A2
|
B2
|
C2
|
D2
|
|
A3
|
B3
|
|
|
|
A4
|
B4
|
|
Star Fabrics
|
|
A5
|
B5
|
|
Star1
|
|
A6
|
B6
|
|
Star2
|
Optional: print for your notebook after class:
Click here for fabric ideas and further information
Supply List Tips & Tools
back
|