Framed Diamonds - Dancing African Ladies
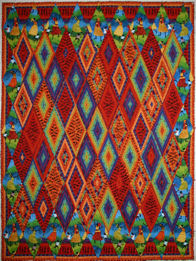
The quilt above measures 63-1/2" x 82-1/2". You may create a design of any size, determined primarily by the amount of yardage you have to work with, and whether you are fussy-cutting specific elements from your chosen fabrics, or cutting randomly (resulting in better use of your yardage with less waste.) NOTE: The cutting and yardage in the chart below IS ONLY A GUIDE. It reflects the cutting for my quilt – and I had left over fabrics when completed after cutting the yardage, below).
FABRICS:
FOCUS FABRIC: Please look in your fabric stash for a great-looking large-scale focus print. My focus print was Julia Cairn's joyous African Ladies print (available several years ago).
INTERESTING STRIPE: I also purchased a stripe fabric that had wide and narrow bands of color, featuring smal-scale black figures – I liked the two colors together. If you do not own any striped fabrics, take your focus print to the fabric store or shop online for a companion stripe that coordinates with the focus fabric. It should share a few of the same colors, and also have some different colors to provide interest and contrast.
MY QUILT EXAMPLE:
I purchased 4-6 yards of the wide stripe, and 3-4 yards of the African Ladies print. You do not need to purchase as much fabric as I did! If you have smaller yardage – such as 2-3 yards of the stripe and 1-1/2 to 2-1/2 yards of the large scale print, you will make a smaller quilt than mine (lap or small to medium wall hanging size, exact measurements unknown). Adding borders will increase the size of your quilt.
If you would like to try the technique, and use less fabric, I recommend bringing yardage you have and using the 3" diamond ruler for a smaller finished design.
CLASS SUPPLIES & LESSONS: The sewing equipment list below provides you with the tools you'll need in class.
- Day 1 (a.m.): Cutting fabric at a unique angle, and fussy-cutting the theme fabrics.
- Day 1 (p.m.): Design layout – linear or star-like medallion effects
- Day 2 (a.m.): Refine design layout. Set up sewing machine; begin construction.
- Day 2 (p.m.): Continued construction, final assembly tips, additional design inspiration, border and quilting recommendations.
Fabric Requirements
|
Yardage
(for larger quilt only)
|
For pieces
|
Cutting for larger quilt, using the 6 1/2" diamond ruler (optional prior to class)
approx. 64" x 83" with borders
|
(Optional) Cutting for smaller quilt, using the 3" diamond ruler (if cutting prior to class)
approx. 25"w x 31" without borders of choice.
|
| 2 to 3 yds theme fabric * (African ladies or other large-scale print with motifs that are no more than 4-5" tall, and 4" wide) |
fussy- cut Diamonds
|
(in class) Fussy cut 24 diamonds, 6 1/2" |
approx 1-1/4 to 2 yds focus print with elements roughly 2-3" tall and wide
24 – 3" diamonds
|
| 5 to 6 yds companion stripe |
pieced Framed Diamonds
|
(in class) Cut 4-1/2" diagonal mirror-image strips at a 22.5 degree angle |
apprx. 2-3/4 to 3 yards stripe for this section and next 3 sections
16 – 3" diamonds
|
| |
Inner top & bottom borders
|
(in class) Cut 16 half diamonds, 6 1/2" |
16 half 3" diamonds |
| |
Inner side borders
|
(in class) Cut 8 split diamonds, 6 1/2" (further instruction provided in class) |
(in class) Cut 8 split diamonds, 3"
|
| |
inner border corners
|
(in class) cut 4 rectangles, 3" x 9 1/2" and 4 rectangles 4" x 5" (further instruction provided in class) |
(in class) cut corner rectangles for 3" size |
| 2 1/2 yds fabric (or 1 yard if cut crosswise and pieced) |
Outer Border 2
|
(after quilt is pieced)
Cut 2 – 3" x 68" border strips (lengthwise)
Cut 2 – 3" x 87" border strips (lengthwise)
|
(after quilt is pieced)
Cut 2 – ___" x ___" border strips (lengthwise)
Cut 2 – ___" x ___" border strips (lengthwise)
|
| 3/4 yard fabric |
Binding
|
Cut 8 strips, 2-3/4" x 42" |
1/3 yard fabric
Cut 4 strips, 2-1/4" x 42"
|
| 5 3/4 yds fabric |
Backing & optional hanging sleeve
|
(cut after quilt top is complete) |
apprx. 1-1/4 to 1-1/2 yd fabric
(cut after quilt top is complete)
|
| Batting |
|
approx. 70" x 90" (slightly larger than finished quilt) |
(slightly larger than finished quilt) |
* Fabric quantity varies depends upon the size and spacing of floral motifs, and number of repeats per yard in the design.
Fabric selection is key to the quilt's striking appearance. Design options and fabric placement will be discussed, aiding in final selection and cutting. Cutting will take place in class. Please bring alternative fabrics you may be considering for your project, especially if you are hesitant regarding your primary selection.
Tools and Equipment
The following list may be daunting – FEAR NOT! Students in previous workshops have requested the items below for use in class. PLEASE MARK ALL EQUIPMENT WITH YOUR NAME
| Quick Diamond Quilts & Beyond by Jan Krentz – text book for class (available for pre-order / purchase – $28 retail; CA sales tax applies within state of CA – or purchase from your local quilt shop) |
| fast2cut "Fussy Cutter" 45º diamond ruler set (available for trial and purchase in class if desired) – excellent for "fussy cutting" motifs ($25 retail; CA sales tax applies within state of CA – or purchase from your local quilt shop) |
| fast2cut quarter and half 45º diamond ruler set (available for trial and purchase in class if desired) – useful for "fussy cutting" motifs, particularly for framed diamonds and border units ($26 retail; CA sales tax applies within state of CA – or purchase from your local quilt shop) |
| fabrics for star and background – bring all fabrics, including scraps. Cut in class to hear technique tips. |
| Sewing machine with filled bobbins (bring your machine manual if it is new or unfamiliar to you) |
| Quarter-inch presser foot, standard foot, and walking foot if you own one (some machines do not stitch well with a quarter-inch foot on bias. Switching to either of the other two feet can improve the quality of your stitching.) |
| Sewing thread to blend with fabric – typically a medium or dark shade (do not select hand quilting thread) |
| Size 10/12 (70/80) sharp, topstitch or quilting machine needles (not universal point) |
| Rotary cutter with new blade (45mm medium or 60mm large cutter size) |
| Self-healing rotary cutting mat (18" x 24") or larger if possible—you may tape two smaller mats edge-to-edge for ease of transporting them. Remember: do not leave your mat in the sun, or in a hot car! |
| Stiletto, skewer or similar tool |
Seam ripper |
Sewing scissors or thread snips |
Paper scissors |
| Sewing pins – glass ball head, fine .5 shaft pins are best for matching seams (preferred instead of heavy-weight quilting pins with plastic heads) |
|
Name Tag with first name in LARGE PRINT
|
spray starch |
pencil / pen for notes |
| 3-ring binder to hold supply list, design layout & class handout sheets |
| 3-5 colored pencils for marking fabric or coloring your design on paper / pencil sharpener / white or silver marking pencil for dark fabrics |
| Sharpie marker – fine and / or extra fine ("twin-tip" Sharpies are wonderful!) |
| Iron (in class, share 1 iron between 3 or 4 students; may be provided by event planner) |
| Approximately 72" x 86" piece of flannel, batting, flannel sheet or flannel-backed plastic tablecloth for design wall surface (strongly recommended) |
| 200-300 safety pins to secure project to flannel for safe transport |
| 1 roll blue painter's tape, 1" width is sufficient |
| Heavy-duty 3-prong extension cord and power strip (may be provided by event planner) |
| Optional: hinged quilter's design mirrors (useful to determine whether a striped fabric will look good as a framed diamond). Bring to class if you own them. |
OPTIONAL SUPPLIES: (useful for class, recommended but not mandatory )
| 4 pieces – 1 1/4" PVC pipe, cut into equal lengths for table leg extensions (slip the pipes onto the tubular legs of a standard banquet table. The extensions elevate the table to a better height to eliminate back strain in class. I am 5'6" and my extensions are 11" high.) |
| digital camera – optional but strongly recommended to be used as a design tool in class |
| 2 rubber door stops (or Tilt'able) – used to tilt your machine towards you slightly for easier sewing on a banquet table |
| reading glasses |
inflatable chair cushion |
Ott light or desk lamp |
| Please arrive and set up 30 minutes before class starts. I want you to get the most from your day, because I have lots of great information to share! |
Optional pages for your notebook (can print after class):

Layout Option: Dancing African Ladies quilt
Permission granted to make several copies for personal use.
|
Click here for fabric ideas and further information
Supply List Tips & Tools
back
|